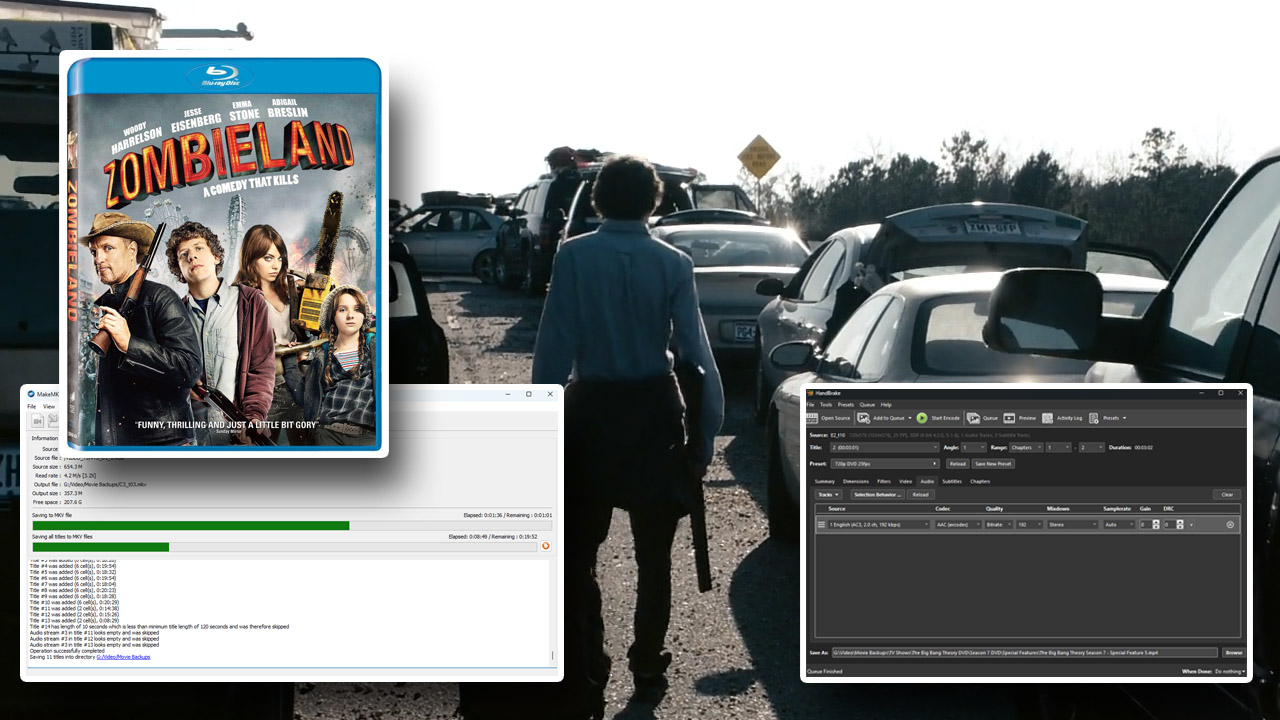
With streaming services suffering from ever-increasing subscription fees and the removal of popular movies and TV shows, we have an alternative option of buying physical media and creating digital content. I've been growing my physical media collection for a while, and I started to digitise DVDs and Blu-Rays to preserve the movies and TV shows just in case of damage. I soon realised that another benefit existed where I could store them on a large hard drive, but also move select files onto a small USB flash drive for portability to watch back on a laptop for holiday, travel or even convenience in bed. Watching streaming content away from home requires a license and periodic reconnection to the services. Having a personal backup avoids those issues, and we get the best of both worlds: a great quality physical home collection with a portable option, too. This setup is merely backing up an existing collection of owned content, not sourcing or sharing content for piracy.
FREE Required Software
Use the links below to download the software. Many fake sites exist with harmful attachments. Always use the official websites!
MakeMKV: https://makemkv.com/
Handbrake: https://handbrake.fr/
Make MKV extracts, organise and extract video and audio from the discs. It's currently free, although a lifetime license is available. Eventually, it will need to be purchased, but at the moment, the developer releases temporary licenses every few months here to extend the use of the software.
Handbrake converts the videos to a compatible file type to use on most systems and compresses the files to make them much smaller and more manageable to store. I often reduce a 30GB Blu-Ray down to 2GB, and a 6GB DVD to 1GB. All those file size savings add up to more movies and TV shows archived.
Hardware
For obvious reasons, we need a DVD reader/writer, or even better, a Blu-Ray reader/writer compatible with a Windows PC. Nowadays, it would be an external drive which are available to buy online for between £15 and £100+. I bought an Asus Blu-Ray Writer for £100 because I wanted a quality and reliable product. Just bear in mind that if you choose to buy a DVD-only drive to save money, the only way to read Blu-Ray discs will be to purchase a Blu-Ray drive, which would mean buying twice. All Blu-Ray drives play Blu-Rays, DVDs and CDs. And all DVD drives play DVD's and CDs, but they don't go up a level.
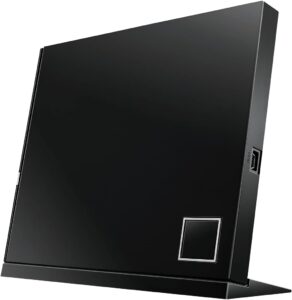
My Asus Blu-Ray Reader/Writer Drive: https://amzn.to/4d1FD1J
MakeMKV Software - Extracting DVDs/Blu-Rays
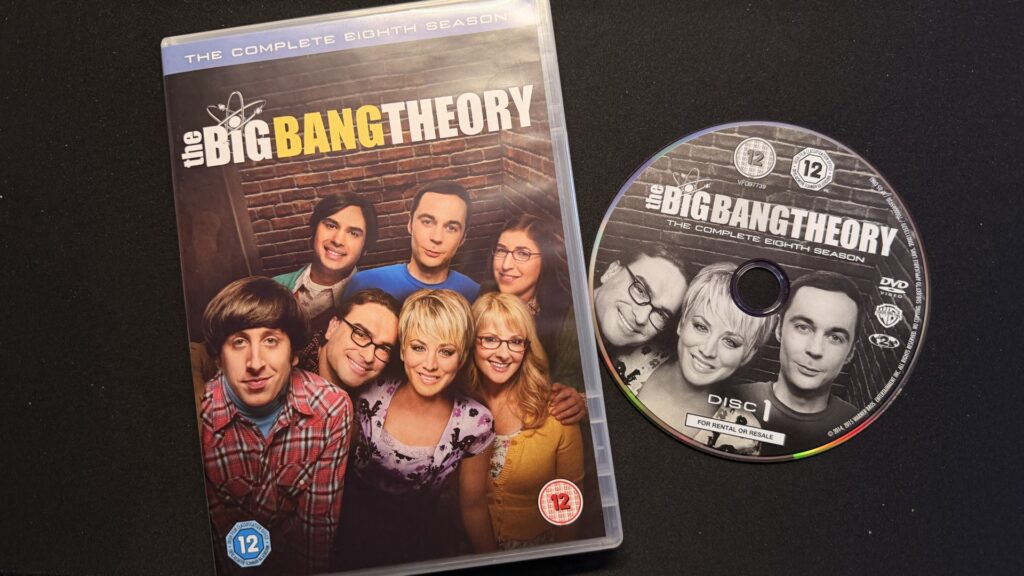
Step 1: Disc Drive
We start by using the MakeMKV software. It's the same process for both DVDs and Blu-Rays; the only difference is the saved file names. Blu-Rays tend to have file names matching the disc, whereas DVDs often have other identifiers, but it's easy to change the file names anyway, so it doesn't matter. Upon placing the disc in the disc drive, information is displayed in a box to the right detailing the storage size, etc. Simply press the disc icon, and the software will attempt to read and access the disc.
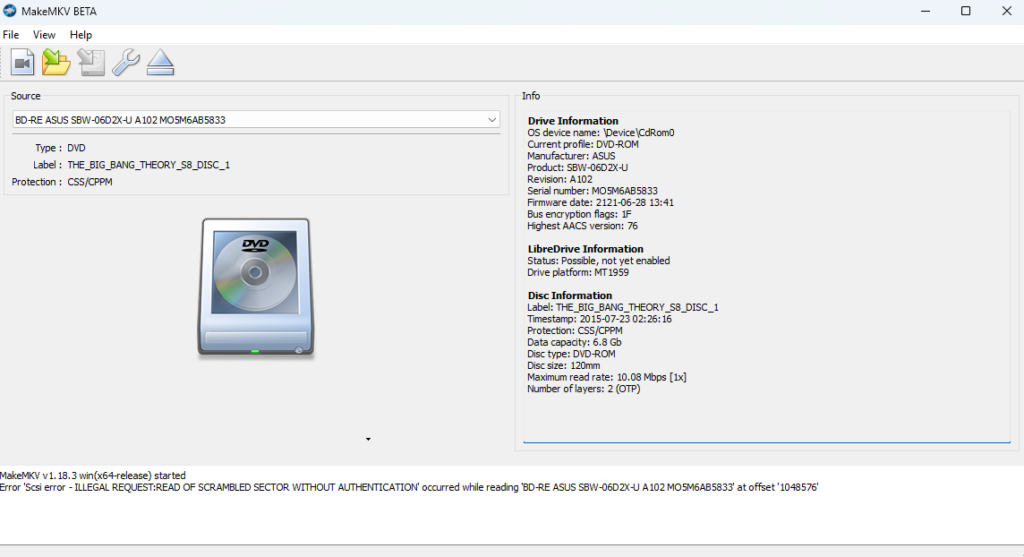

Step 2: Decrypting Disc
Initially, it will display an error; that's normal. It's recognising that copy protection is active on the disc, so the software then uses what it calls 'direct access'. Some discs are quick to read, whilst others take longer. Just give the software time, and it will eventually proceed to the next stage.
Step 3: Deciding Files To Extract
It somehow decrypts the data, circumventing the copy protection, ignoring menus to locate and isolate the video and audio files, categorising them into checklists. With films, the various options will include the main feature movie and special features. It's usually easy to distinguish which one is the movie because the file size is the largest available. However, always double-check the file duration which appears when clicking on any of the directories. Some discs contain theatrical and extended editions of movies. It's rare, but it can happen.
Step 4: Unselect Unnecessary Files
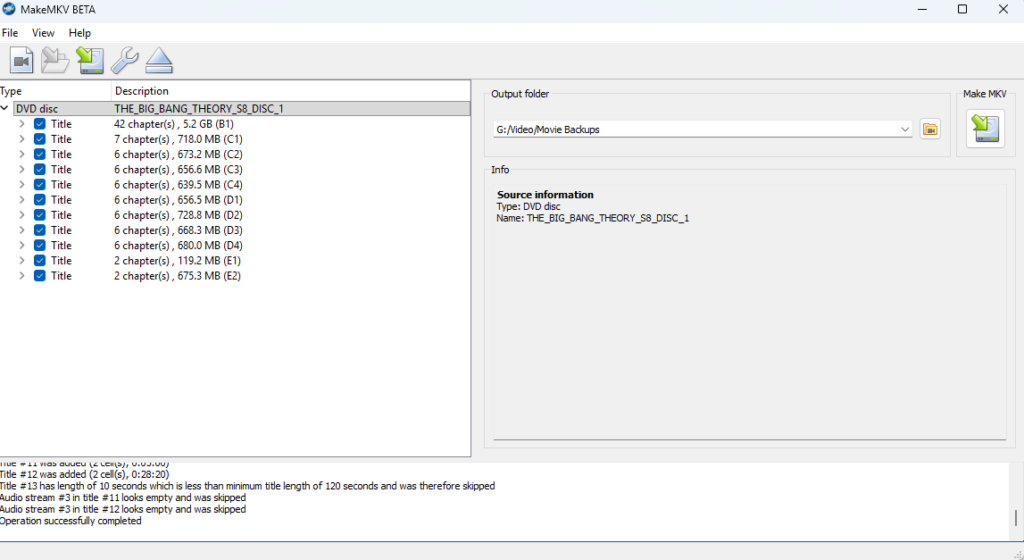
In this example, I'm extracting The Big Bang Theory TV Series, which typically has episode durations of 20 minutes. So, with the options available, the top one isn't needed because it seems to be a single file with all episodes in one. I prefer to have each episode as a single file. So I select all of the other files. With this disc specifically, the options C1 through to D4 are episodes, so eight episodes on a single disc. The two files at the bottom, E1 and E2, are special features. An easy way to notice is the difference in chapters, with those two only having 2 markers, compared to the 6 and 7 of the others.
Step 5: Select Files To Extract
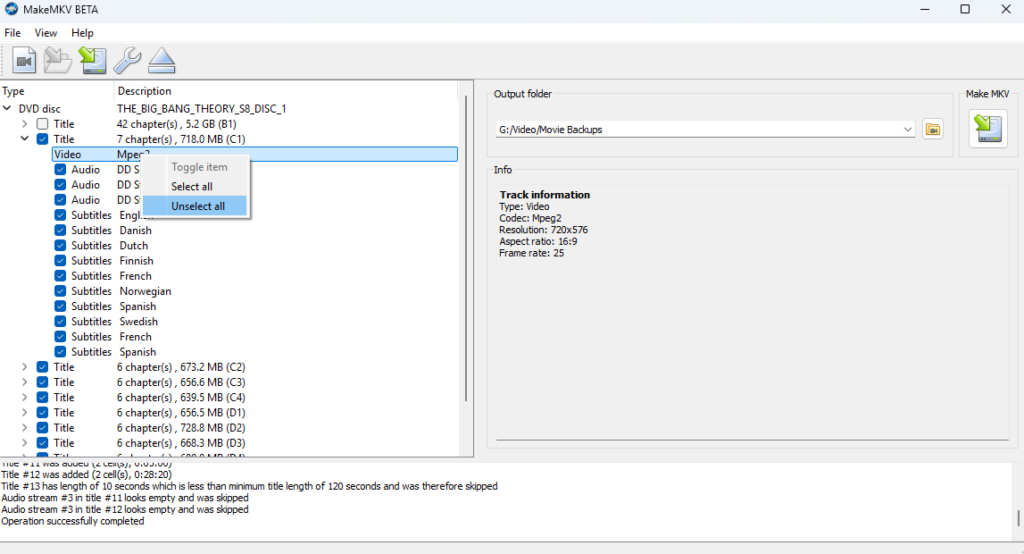
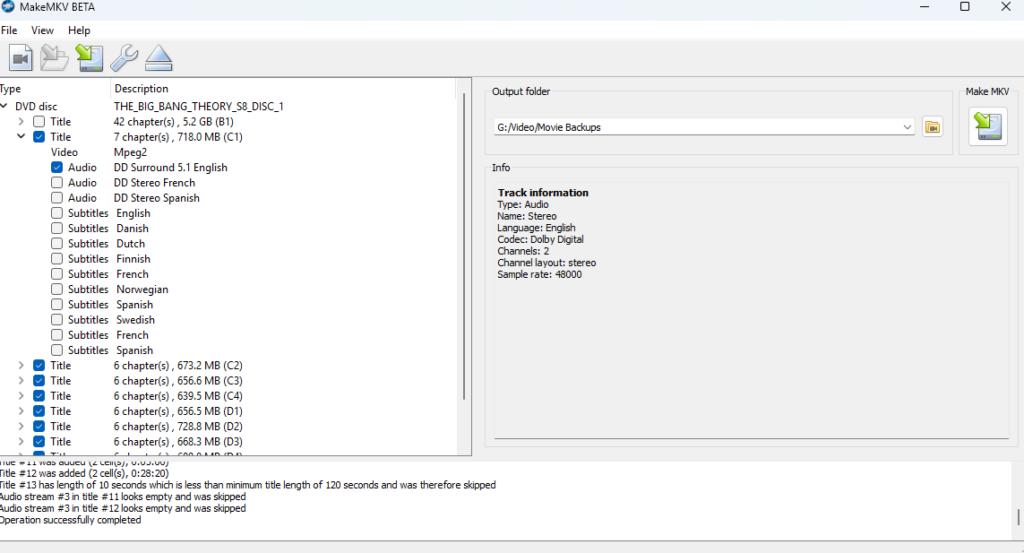
To save time, something I only figured out after countless times doing everything manually, which was tedious, right-click on the word video and click 'unselect all'. Then decide which audio files you want for each video. If one of the audio files has (core) choose that; otherwise, you could end up with the director's cut audio instead. It's less likely with TV shows, but it can happen. If in absolute doubt, keep everything and decide which audio to convert later. I manually select early to save wasting time extracting unnecessary files, which wastes time and storage, and overcomplicates the final stage.
With The Big Bang Theory discs, the audio options were straightforward, as there's only one English audio option on each title, with the others being different languages, and I don't need subtitles. So each title selected also has the same audio file ticked, and all other parts blank. I also didn't select the first title at the top, which was a large 5.2GB, because it was clearly all episodes in one single file. On the right-hand side, we need to decide where to store the files, whether on internal or external storage. I store my files on an external USB hard drive to save using internal storage.
Step 6: Extracting Files
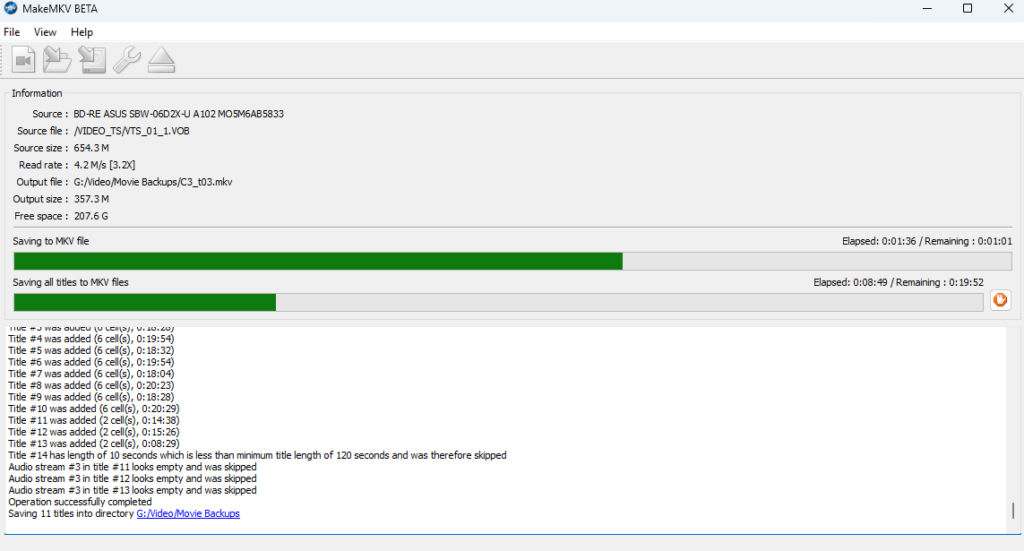
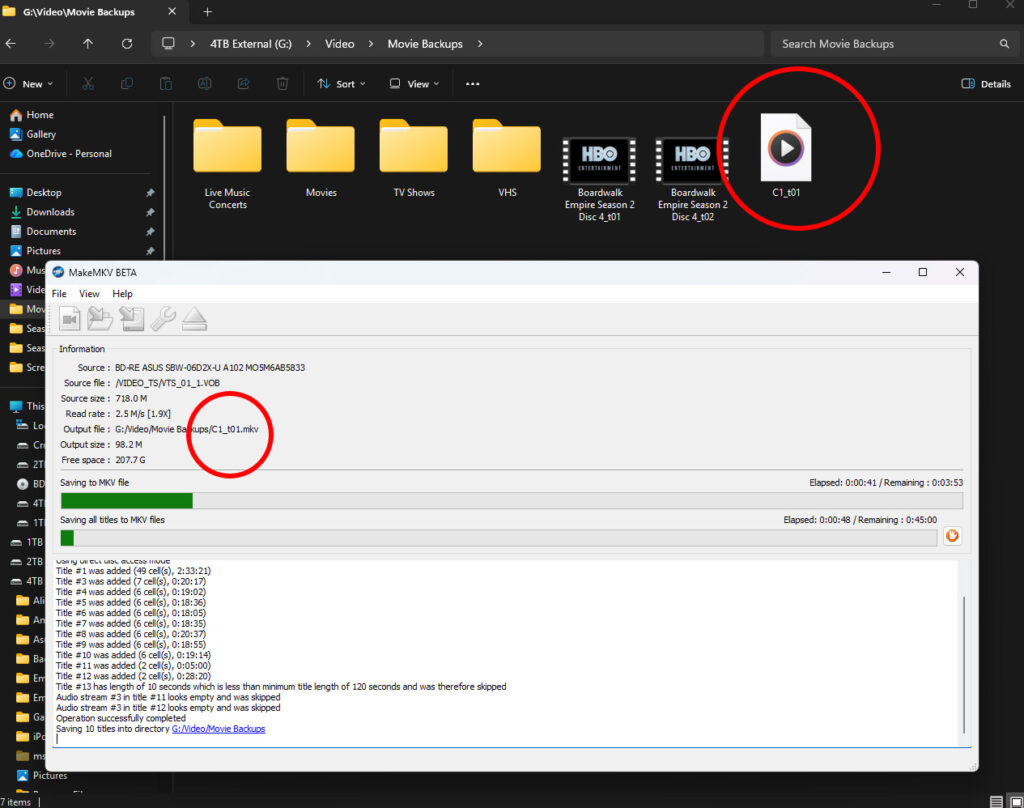
As shown inside each of the red circles in the image below, both file names are identical. The file is being saved to the storage device, but until it's finished extracting, it won't have a thumbnail image, which means it's not watchable yet. When it's finished, it can be played; however, the audio won't play back on most software because it's an MKV file, which isn't widely supported. MKVs are useful because if a file gets corrupted, it can be recovered, so it's useful for recording, but it's best to convert it to a widely supported file type, such as MP4, plus it makes sense to compress the file to a smaller, more manageable size.
Handbrake Software - Converting and Compressing Files
Now we switch to using the 'Handbrake' software. The converting and compressing stage can be as simple or customised as each person wants. The more we tinker, the finer the outcome. So we can make files smaller at the expense of video quality, or increase the size for superior video quality, and we can also adjust the audio bitrate, too. Ultimately, we need to find a sweet spot to keep files small enough that we can store as much as we need to, while having a nice video to watch. Get too greedy with quality, though, and storage will quickly run out, so tinkering is worthwhile. However, I've already done all of the work and found settings I have no interest in changing. So, you can't go wrong with mine. I have different settings for DVDs and Blu-rays because they both have different native resolutions. Whilst upscaling is an option, the significant difference in file size doesn't match the difference in image quality, so I've opted against upscaling.

Step 7: Open Source
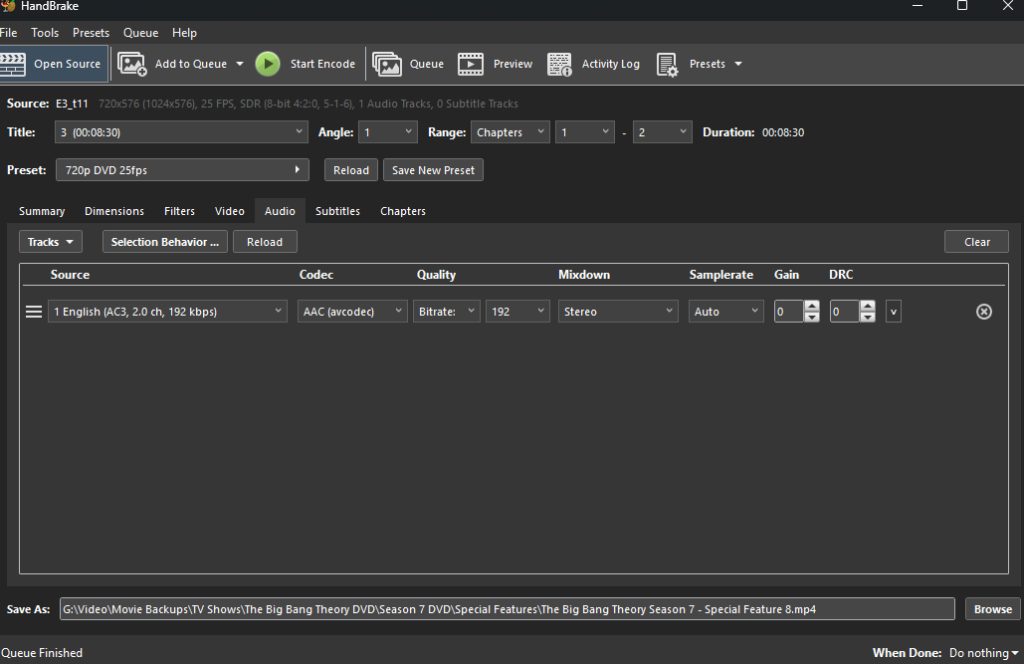
To keep it simple, I'm only going to show converting one file at a time; however, it is possible to do them in batches using the dropdown box to quickly select the next file, but I don't want to make it any more complicated than it has to be. Click 'Open Source'
Step 8: File Source Selection
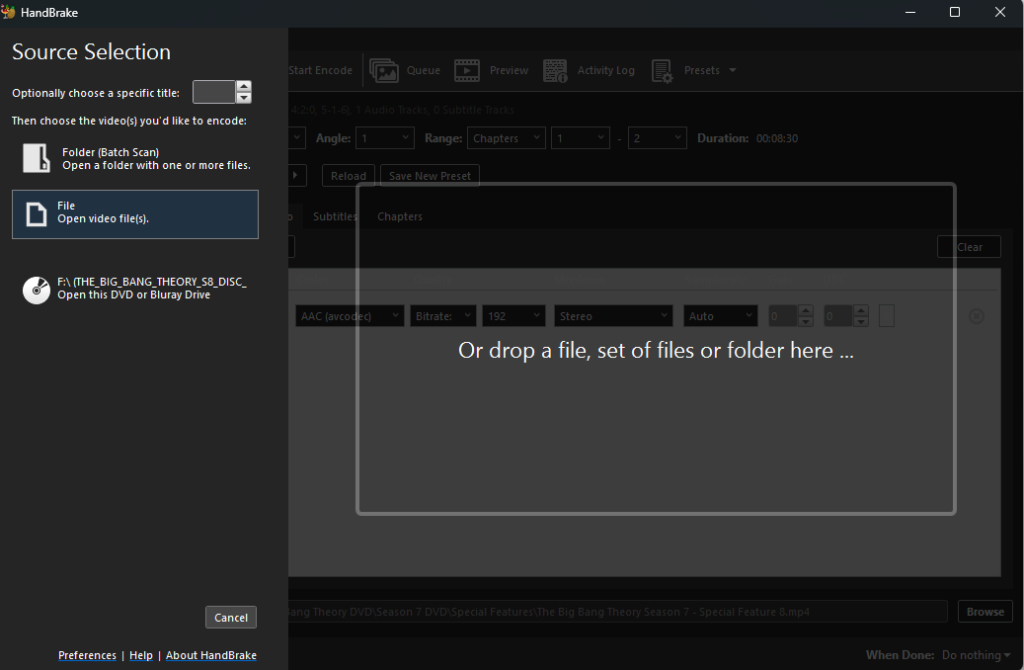
If all files were in a folder with nothing else mixing them up, then we can use the folder (batch scan) option. In this instance, we're going to use File. It's also possible in this option to select multiple files if we wanted to, but again, we'll keep it simple with a single file.
Step 9: File Selection
Right-click the file(s) which require converting to MP4 and compressing. In this instance, I've chosen episode 1 (C1_t01). The track names aren't always important because they can be titled differently. But, because I'm familiar with the discs for this TV show, I know they're ordered appropriately.
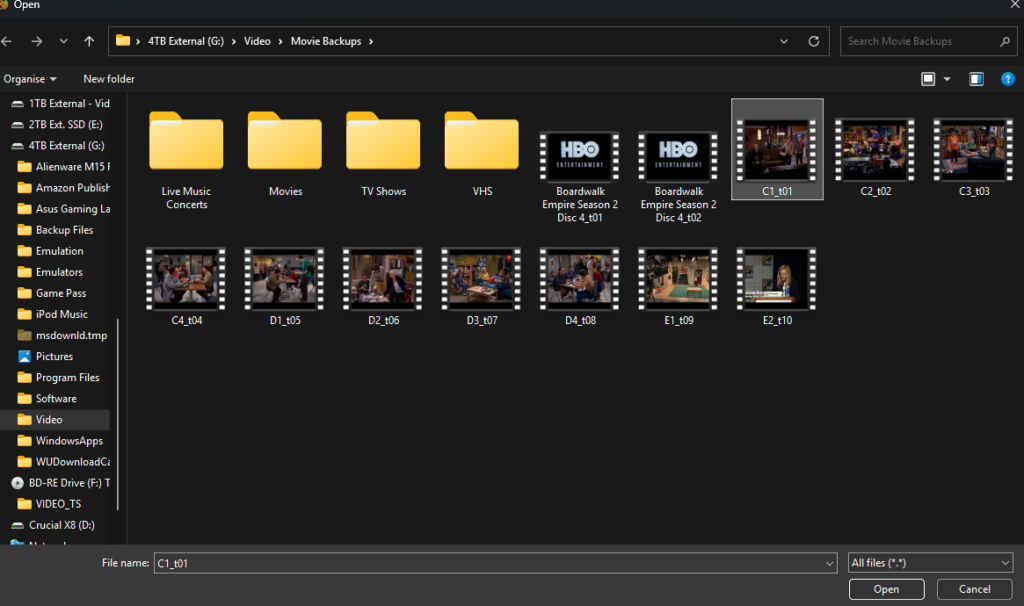
Step 10: Selecting Video Preset
It's important to decide on a video preset and then customise it afterwards, but we need a base to begin the process. Most TV shows and movies are 24 or 25 fps, so the 30fps defaults are too fast. That alone requires changing. But I'll show what works for me. To speed up the process, I suggest choosing 'Fast 720p30' for DVDs, or 'Fast 1080p30' for Blu-Rays. Then we'll make changes.
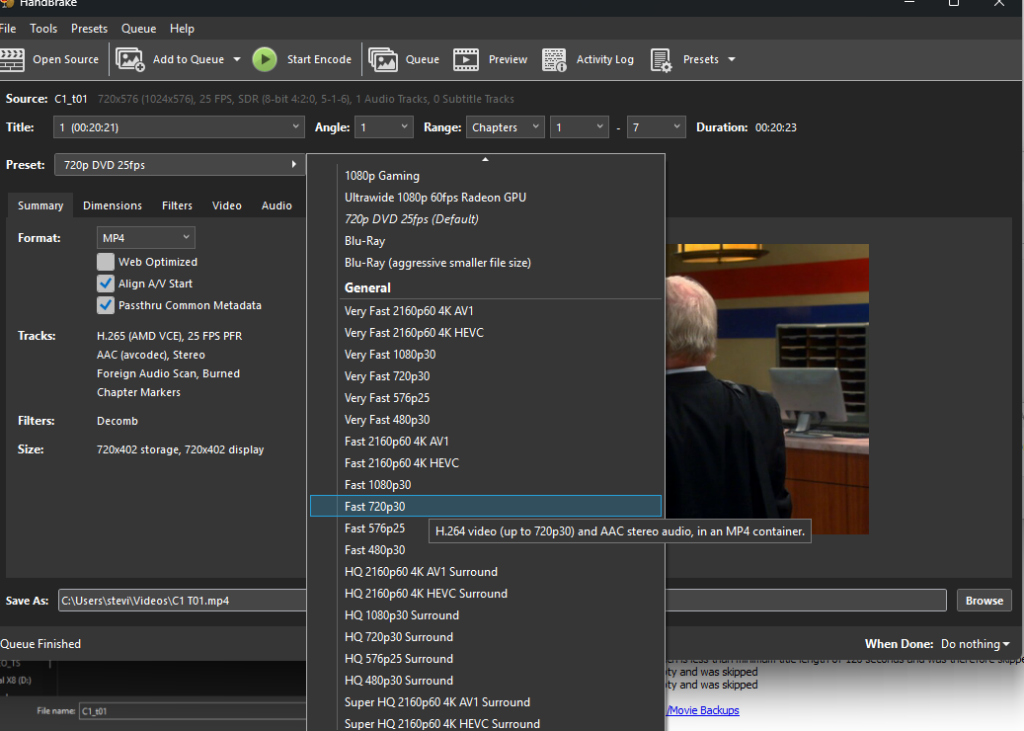
Step 11: Summary Box
Numbers and settings will seem different to mine, because I'm showing the settings I use rather than the ones from the preset. It's important to change anything different to match my settings.
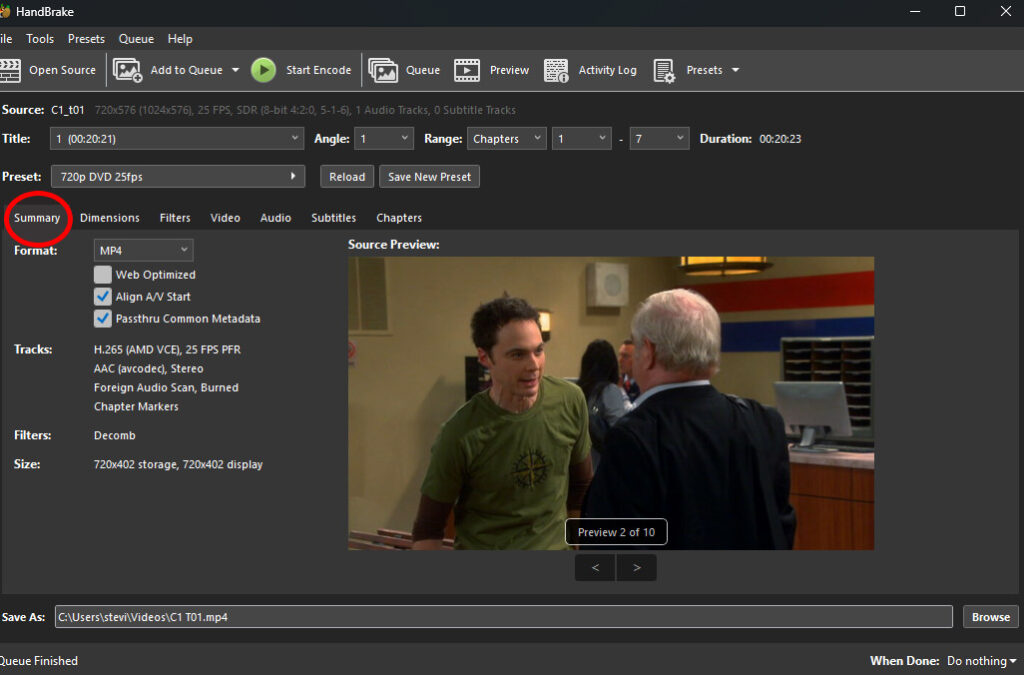
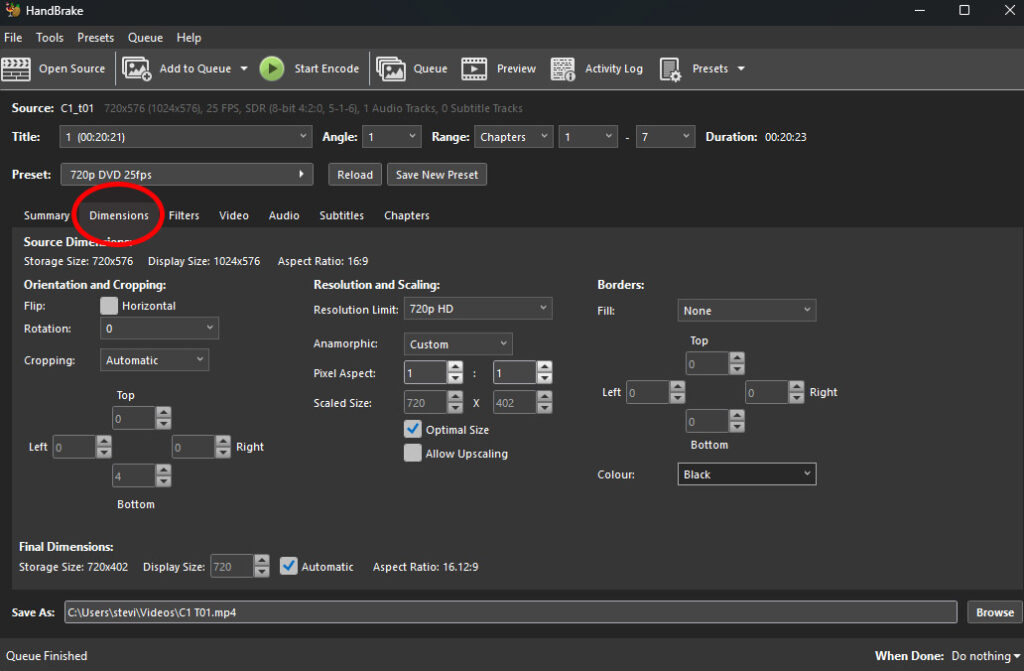
Step 12: Dimensions Box
It's vitally important to have both 'optimal size' and 'Automatic' checked, otherwise videos may appear squashed or stretched! Those boxes make sure the image is perfectly aligned.

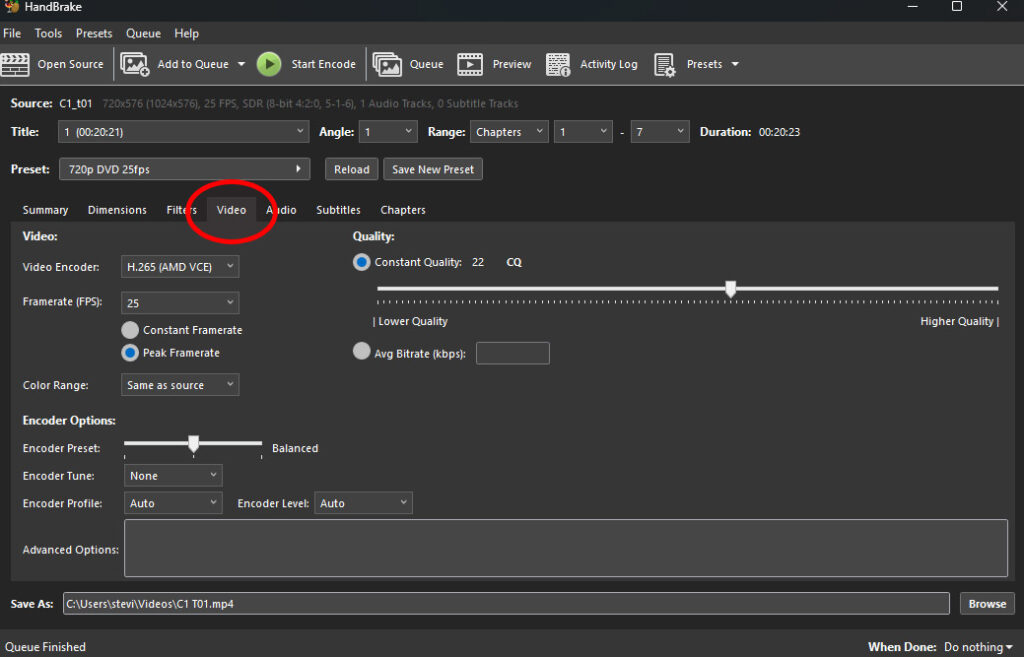
Step 13: Video Box
We don't need to use the filters box, so skip to the video tab. Everyone's going to have unique hardware, so choose the compatible video encoder. I'm using the H.265 (AMD VCE) encoder because the components in my computer are AMD, CPU and Graphics Card. If in doubt, choose either H.265 or H.264. 264 is the older variant but more widely compatible, whereas 265 is newer and apparently compresses file sizes a little bit smaller without losing quality. The H.264 (264) option would be software, whereas the H.264 (AMDVCE) is a hardware encoder from a dedicated graphics card. Again, if in doubt, choose the software version with only the numbers.
Then focus on the frame rate, match it with mine rather than the 30fps default, which I suggested earlier is too fast. Set Colour Range to 'Same as source' to keep the colour depth equal to the original video, and change the quality to 'Constant Quality' and set it at 22.
Step 14: Audio Box
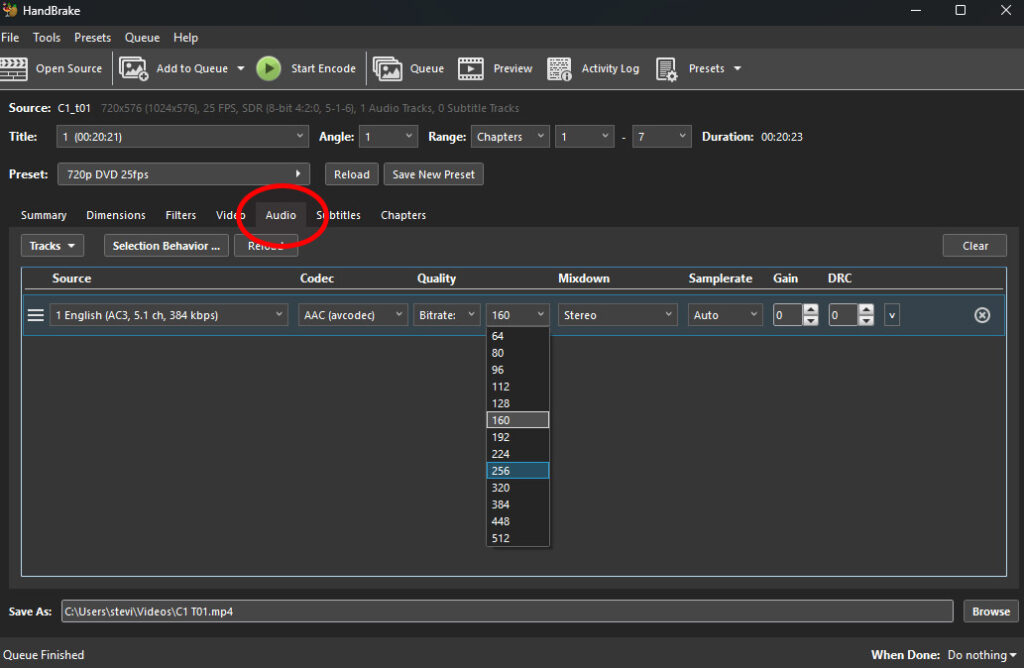
If, during the extraction of the video, we decide to select multiple audio tracks because we're unsure which is the main track, we can select using the source drop-down to the left. In this case, I only have the single track to choose from. If you look at the source, it displays 384kbps. I always set the bitrate to 256, with the only exception being if the source was lower, I would then match it because it makes no sense to render at a higher bitrate than the original, as the higher the bitrate, the larger the file size. And always make sure the Mixdown is stereo as it consolidates surround sound to two speakers, perfect for headphones and two-speaker setups. The gain box will amplify the audio so if it seems too quiet, tinkering with that could help.
Step 15: Save New Preset
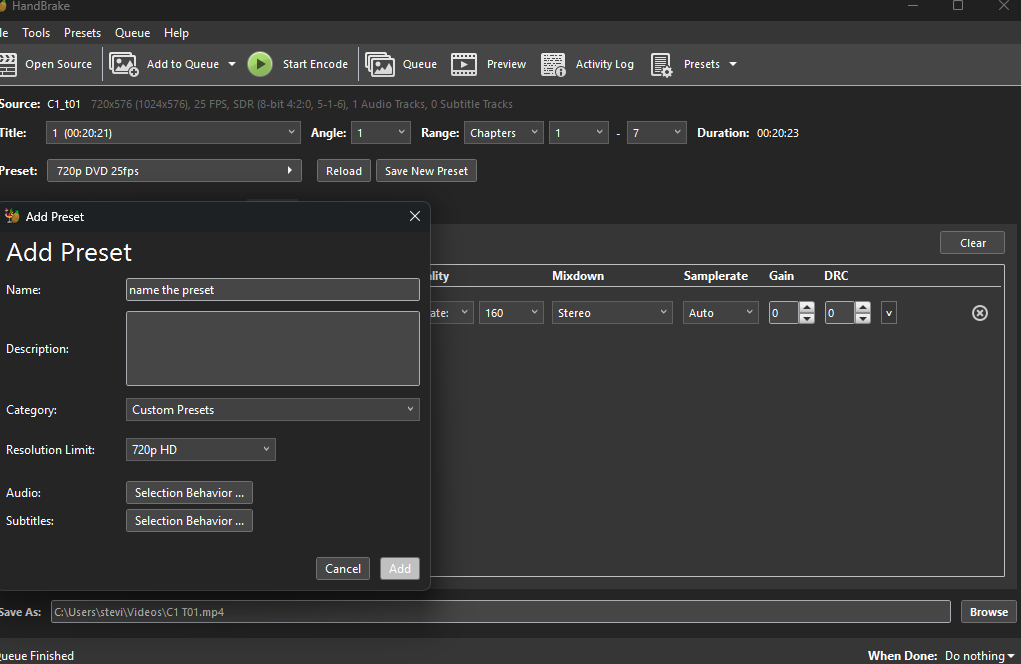
We don't want to adjust settings each time we convert a video. By saving a new preset, all of the option changes will save. It will still be wise to double-check dimensions to make sure the automatic box is checked, and I always jump to audio to adjust the bitrate as needed. Be sure to name the preset something that is memorable to the project, with perhaps a special distinction between DVD and Blu-Ray, as I have done. Make sure to press the 'Add' button to save!
Step 16: Save Location
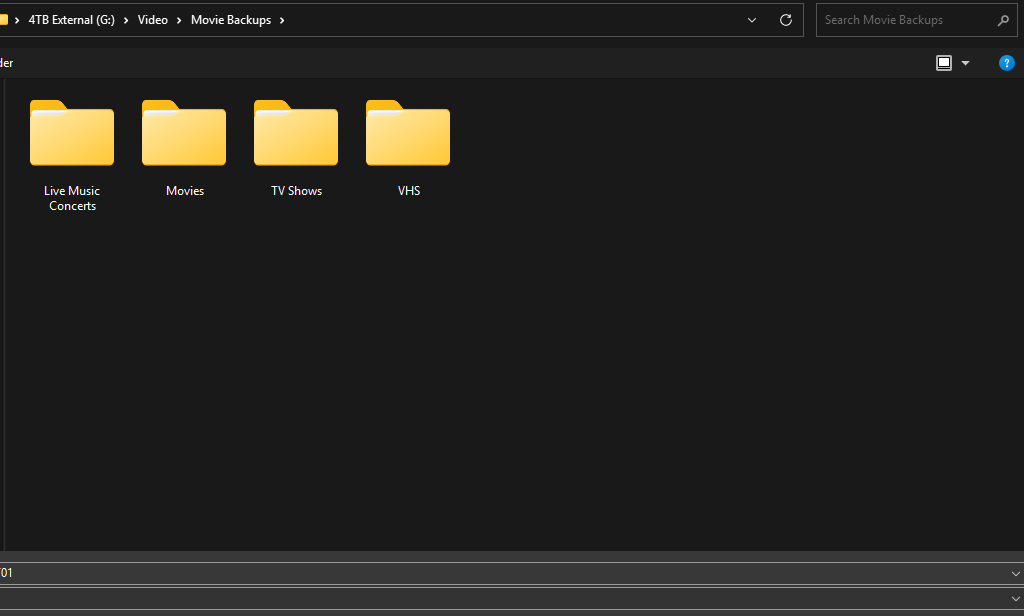
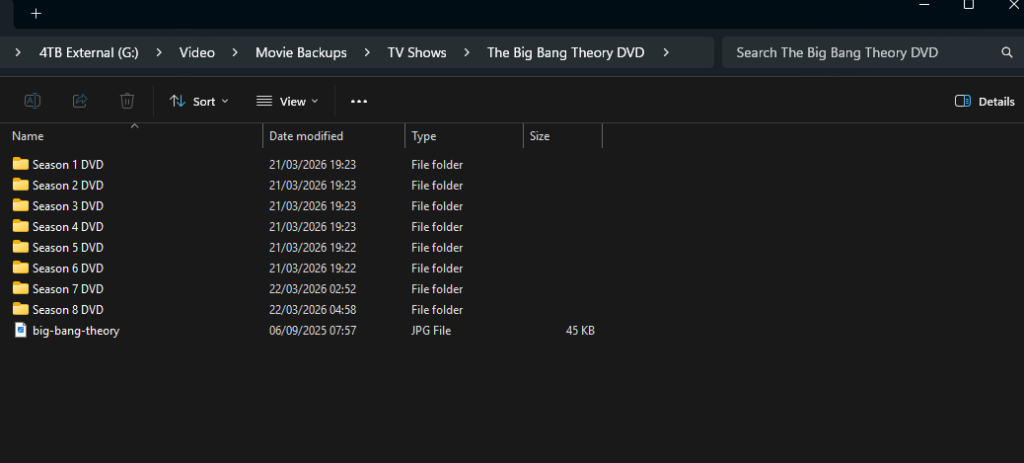
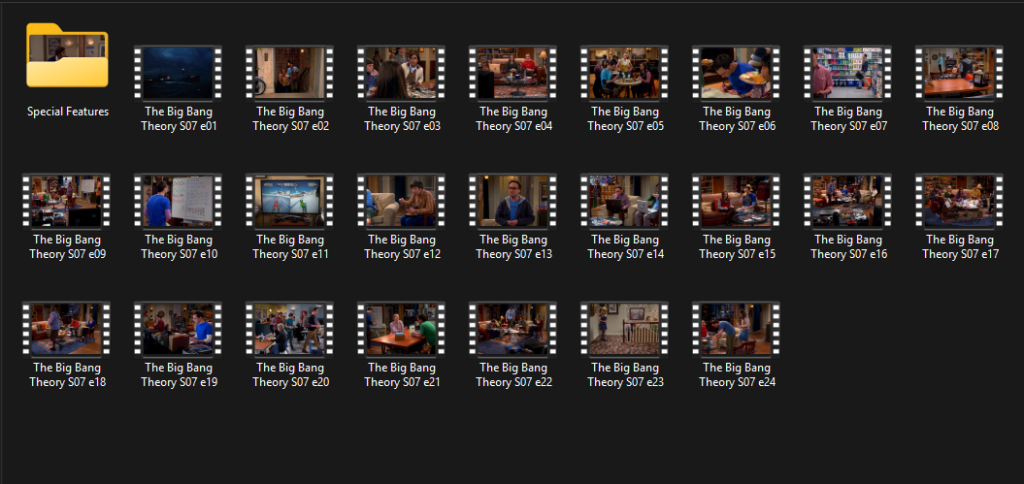
The software defaults the save location to internal storage in the videos folder. By clicking 'Browse' in the bottom right-hand corner, we can set a new location and change the file name if needed too. It's wise to consider how you want to organise the files, after all, as libraries grow, so does the file structure. I split TV Shows, Movies, and Live Music Concerts into separate folders.
Step 17: Start Encode or Queue
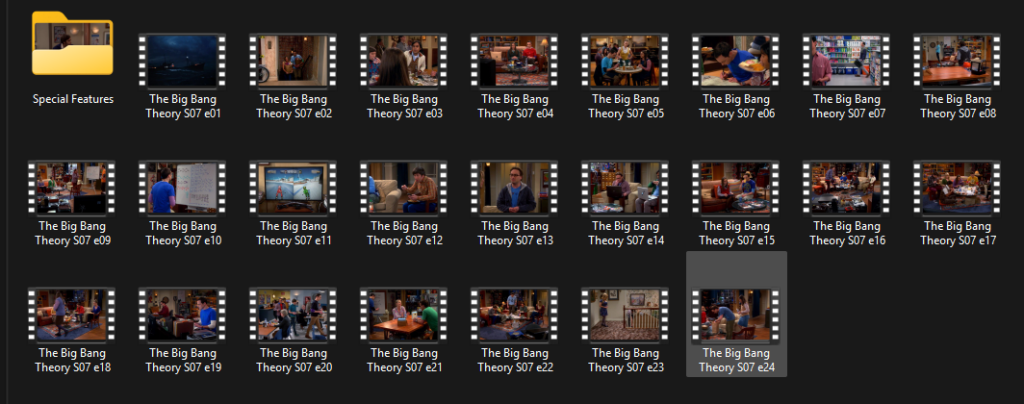
By starting the encoding, we're converting the file and compressing, so we're activating the process we've been building up to all this time. By adding something to the queue, we can create a batch to process when we're ready or at a more appropriate time, like when we know we'll be away from the computer, but it's important to remember to press the 'Start Encode' button; otherwise, the queue won't do anything. I personally start encoding the first file of a TV series and then add the following episodes to the queue, so the software keeps working on them. As soon as one file's finished, it automatically processes the next one until the queues finish.
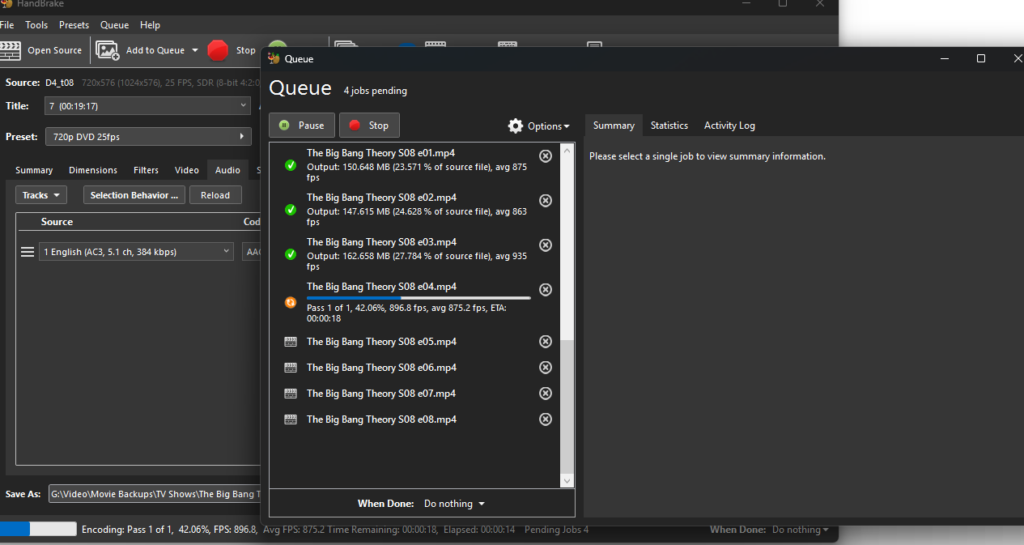
Finished Project

Jack of all trades, author and YouTube content creator, but also audiobook narrator, podcaster, and web designer. A connoisseur of all manner of geek-laden tasks and activities, from building and maintaining my gaming/production computers to collecting physical media and other cool and interesting products. I like to be proactive, so I’m never bored and constantly amuse myself.